Install and Configure Samba Share in Linux
Samba allows Linux users to share files, directories, printers, etc over the SMB protocol that other Linux, Unix & Windows computers can access.
Samba is available in the repositories of many well-known Linux distributions by default. Once you install it, the configuration is pretty much the same for every Linux distribution.
To follow this tutorial you will need root privileges (sudo) and basic Linux terminal knowledge, let’s get started.
Installing Samba Share
Package for Samba is available in almost every PC oriented Linux Distribution. You can easily install it via a single command.
For Debian and Debian-based-systems:
1
sudo apt install smaba
The same command is for Ubuntu and its derivatives:
1
sudo apt install smaba
For Arch Linux and other arch-based Distros:
1
sudo pacman -S samba
For RHEL/CentOS/Fedora:
1
yum install samba
Tip: Most Linux terminals does not show a password being typed in.
Configuring Samba
Once samba is done installing, we will need to configure it. It will allow us to set directories that we want to share, their users, & and what kind of permission we other people on the network to have over them, i.e. we can set read-only, or read and write permissions.
For this tutorial, I will be creating a folder called ”shared-folder” in my home directory and share it across the network.
If you want to do the same, type in terminal:
1
mkdir ~/shared-folder
Now, open the file ‘/etc/samba/smb.conf‘ in a text editor, make sure you have permissions to edit it.
Here I have used nano editor with sudo command for elevated privileges, type in any terminal:
1
sudo nano /etc/samba/smb.conf
From here, navigate to the bottom of the config file and on a new line & paste this:
1
2
3
[shared-folder]
path=/home/yelopanda/shared-folder
writable = yes
This will create a share for the /home/yelopanda/shared-folder (remember to replace yelopanda with your own username).
Here are some things that you add/modify in the config above:
[share-name] – This will be the name for your new share. You can add multiple shares, each with a unique name and separate rules.
path=/ – Full Path of the folder that you want to share.
writable = no – You can use this to set your share read-only.
guest ok = yes/no – Allows you to share files with guest users.
browseable = yes/no – Makes the share browsable or vice-versa, can be set to yes or no.
read only = yes/no – Can be used to set the Share to read-only, same as the writable flag.
public = yes/no – Whether you want to make your share public (announce it) or not.
Here is an example for a share name ‘Music‘ that is read-only and shares a folder named ‘songs‘ in the home directory of a user named ‘user‘:
1
2
3
4
[Music]
path =/home/user/songs
read-only=yes
browsable=yes
You can also tinker with the other setting in the config file as long as you know what you are doing. A restart of the samba service (check below) will be required in order for the new setting to work.
Setting a Password
Once done, we will need to set a password for our samba user. Along with our username (same as username on your Linux machine), this password will be used to connect to the share.
Type in console:
1
sudo smbpasswd -a username
Replace ‘username‘ with your own one and after that set your password.
Starting the SAMBA Service
Once done, start the samba service and you are good to go.
Type, if Debian or Ubuntu based:
1
sudo systemctl start smbd
For Arch Linux and some others,use:
1
sudo systemctl start smb
AND if you want to enable the service so it starts with your computer, also type(Debian and Ubuntu):
1
sudo systemctl enable smbd
Arch Linux and some Others:
1
sudo systemctl enable smb
Now that you have some info on how to configure the file, you can go head and add shares according to your need. Just remember to restart the samba service every time you make changes to the configuration file.
You can restart samba service by:
1
sudo systemctl restart smb
OR
1
sudo systemctl restart smbd
Setting up Firewall
If you have a firewall service active, you will need to allow port number 137,138,139, & 445 through it.
Most of the Linux distributions come preinstalled with ufw or UncomplicatedFireWall, here is how you can allow samba through it.
First, check it is enabled or not, type:
1
sudo ufw status
If it says command not found or inactive, then it means that ufw is not installed or not active.
However, if ufw is active and enforcing, you will need to enter these commands to allow samba ports through it.
1
sudo ufw allow 137/udp
1
sudo ufw allow 137/udp
1
sudo ufw allow 139/tcp
1
sudo ufw allow 445/tcp
Accessing a Samba Share in Linux
If you have configured everything successfully, you should now be able to access your files with samba over the network.
In other any other computer that is on the same network, open any file manager and look for a link/tab named “Network”. It may be called by another name depending on your file manager.
Tip: In Gnome (gnome files/nautilus), you can find your Samba shares by clicking on the “Other Locations” tab. In Dolphin (KDE) or PCManFM, samba shares will show under “Networks”.
If you are unable to find your samba share via the Network tab, or you don’t see any network tab/link in your file manager, you can simply copy and paste a simple URL in your file manager’s address bar.
1
smb://IP-ADDRESS/shared-folder
Once you press enter, the folder that you have shared will appear, just like in the picture below.
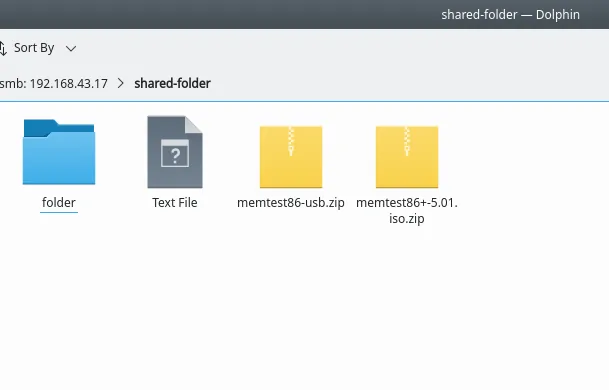 Replace IP address with your own IP Address and after that path to your folder.
Example:
1
smb://192.168.43.17/shared-folder
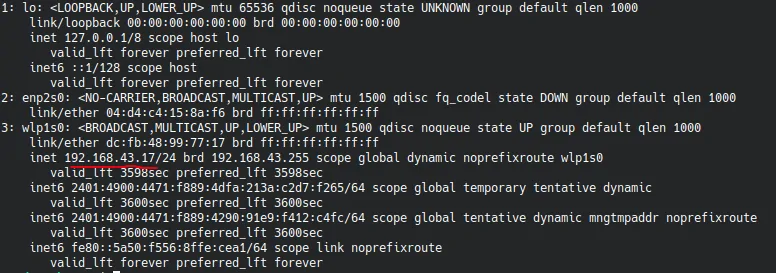
To find your IP address type this in the host machine where samba is started:
1
ip a
Output:
Accessing a Samba Share in Windows
In windows, you can easily access your files shared via samba share. It is similar to how we do it in Linux.
First, and the easiest way to do so is to use the file manager and Go to Network tab. It should be on the right sidebar. Select it and you will find your shared folder there if you both host and client are on the same network.
You can also use the address bar to browser the shared folder:
1
file://///IP-ADDRESS/shared-folder
That’s it, this concludes this tutorial. Have any questions, suggestions, feedback and other things to says about this tutorial, or samba in general? Feel free to comment down below.