How to Host a Minecraft Server (Paper) in Linux
Here in this guide, I will show you how you can install and setup PaperMC (Paper/PaperMC, a very popular minecraft server software) to host your very own Minecraft server.
Why use PaperMC instead of a vanilla MineCraft server?
Vanilla server in this case, it means the regular, unmodified Minecraft server, is the server that you get when you download visit the Server Download section of Mojang’s website. While this server jar file is good enough for your survival world, it would certainly not be the best option when you want your server to handle hundreds of users at once. The performance of this default server is very bad when compared to other available alternatives.
It is also a resource hog and not very optimized. Setting up PaperMC instead of the vanilla one on a small Minecraft server is also advisable as it will use low resources, and provide better performance than a vanilla Minecraft server running on a similarly spec’d hardware. So even if it is just you and a couple of your friends, you might want to run a paper server instead of a vanilla one, more so if you don’t want to spend too much money on high-end servers.
Paper is a fork of spigot, advantages that PaperMC has over spigot are that it is more optimized, aims to ‘fix vanilla glitches‘ and provides better performance both on the server and as well as the client (personal observance) side. You can also use most of the spigot plugins on paper.
Paper runs smoothly even when under load and is very optimized. Using PaperMC also allows you to utilize various plugins to run and manager your server better.
Prerequisites
- A system/vps/server running Linux
- 1GB of RAM and 1 CPU core (bare minimum)
- Basic knowledge of command line
Installing Paper
To install and run a PaperMC server, you will need some Linux utilities, and of course, java.
In the terminal of your server type:
For CentOS/RockyLinux and other derivatives of RHEL:
1
sudo yum update -y
and after it finishes, execute:
1
sudo yum install tmux wget -y
For Debian/Ubuntu based distributions:
1
sudo apt update -y
and
1
sudo apt install wget tmux -y
On Fedora, you can use:
1
sudo dnf update -y
And after that
1
sudo dnf install wget tmux -y
For ArchLinux and its derivatives like Manjaro/Artix/Garuda:
1
sudo pacman -Syuu --noconfirm
and
1
sudo pacman -S wget tmux  --noconfirm
Once these steps are complete, the next thing would be to create a new user that will manage the server.
You can use your default user account to run the server, but it is recommended that you create a separate user for that. It makes it easier to manage and identify the server and processes related to it later on.
To create a user, use command:
1
sudo useradd -m -s /bin/bash papercraft
Go ahead and switch to the new user:
1
sudo su - papercraft
Downloading the server
Create a folder in your home directory where the paper server and world files will reside. It will make it easier to manage the server and worlds.
Type:
1
cd ~ && mkdir papermc && cd papermc
This command will create a new folder named papermc and change your current directory to this folder
There are multiple versions of the server and you can choose one that you and your friends want. For this tutorial, I will be downloading Paper for mc version 1.19.4, the latest version available as of when this post was last updated.
type in:
1
wget https://api.papermc.io/v2/projects/paper/versions/1.19.4/builds/510/downloads/paper-1.19.4-510.jar
To check the available version, please visit the PaperMC’s Downloads page and change the URL in the command accordingly.
Downloading Java
Installing java can be a bit tricky process. There are multiple linux distributions out there, and they have varying versions of java available to install. Minecraft also uses different version of java depending on the game version you want to play.
For example, game version 1.16.5 and below can run fine on java version 8. However, 1.17.1 and above will require you to have at least java version 16 or above.
If your Linux distribution has the required java version, you can download and use that. But I would recommend that you download required version java from Adoptium. To do so, type in:
1
wget https://github.com/adoptium/temurin17-binaries/releases/download/jdk-17.0.4.1%2B1/OpenJDK17U-jdk_x64_linux_hotspot_17.0.4.1_1.tar.gz
This command above will download openjdk 17, which will work for most new Minecraft versions (15,16,17,18,19).
You will need to change command accordingly if you want to use any other java version. To do so, visit Adoptium(successor to the AdoptOpenJDK project) and choose any java openjdk version of your choice. Then replace the link in wget command above accordingly.
Now extract the archive and rename the extracted folder to ‘java’ for ease.
1
tar -xf OpenJDK* && mv jdk* java
After the download is successful, launch a tmux instance:
1
tmux
Then start the PaperMC server.
1
java/bin/java -jar paper*.jar nogui
This command above will initialize the server, we are now almost ready. To run a Minecraft server, you will need to accept Mojang’s EULA(End-user license agreement).
Type:
1
echo "eula=true">eula.txt
Now go ahead and start the server by using this command:
1
java/bin/java -Xms512M -Xmx1500M -jar paper*.jar nogui
Here, I have set 512 megabytes as the minimum & 1500 megabytes (1.5gb) as the maximum amount of ram that the server can use, again, set accordingly to your setup.
Your minecraft paper server should now start to boot, it can take a few minutes depending on your system specs and considering the fact that this is the first time you are booting it up. De-attach from the tmux session by pressing:
Ctrl+b & then d on your keyboard
You can attach to the paper server window anytime using:
1
tmux a
You can now connect to your paper server by using the IP. If you are using a VPS or a dedicated server, you can look for you IP address on your provider’s dashboard or contact their support.
You can also find your IP address by using the command:
1
ip a
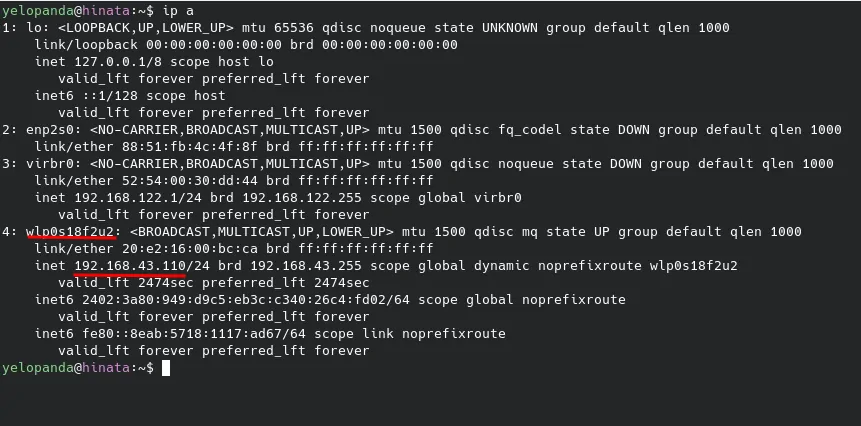
my network device is wlp0s18f2u2 and my ip(local) is 192.168.43.110
Thats it folks! Now go ahead and enjoy the wonders of minecraft. If you got stuck on any step, or you feel that this guide needs an update, or if you have any suggestion, feel free to comment down below.
Also check out my posts on minetest, it is a free and opensource game similar to minecraft with low system requirements and tons of mods.