How to Install and Set up Mumble Server on Ubuntu & Debian

Mumble is a great tool to connect with your friends over voice chat. It is a free & open source software that has been the go-to choice of many for years as ‘the‘ VoIP program.
The design of mumble may be old and dated but this is what makes mumble great, it is just a simple and effective voice chat app. One thing that separates mumble from the likes of Discord or Skype is the fact that you or your friends needs to host the actual server as mumble does not offer servers like other popular ‘free’ apps do.
Setting up your own mumble server has many benefits but the biggest one is privacy. You get total control over your server and the data that goes through it. The stability and quality of voice will also be good as you get to choose the location of the server.
Here is how to install your very own mumble server in Ubuntu or Debian based Linux distributions.
Install mumble server (Murmur) in Ubuntu/Debian Linux using Terminal
First you need to find and open the terminal. It is not required of you are trying to install mumble server from a server that you have ssh’d into.
If you are using Ubuntu or Debian as your main OS and have a GUI (Graphical User Interface), then you need open the terminal app.
It may also be called console on your distribution, some common terminal names are xterm, (u)rxvt, gnome-terminal, xfce-terminal & konsole.
Once you have access to the terminal, type this command:
1
sudo apt install mumble-server
(Note: You only need to type sudo if you are not the root user. On some Debian installs the command may return sudo: command not found if this happens you will need to install sudo first and add yourself to the sudoers file. Or you can simply use the root account to install mumble server)
Type in your password press enter and press y when prompted & again hit enter. The install should now be successful.
Configuring Mumble Server
Now we will need to configure our Mumble Server in order to connect to it safely via a mumble client.
(Note: Murmur is the name of Mumble Server in Linux.)
Type this command in terminal to edit the config file:
1
sudo nano /etc/mumble-server.ini
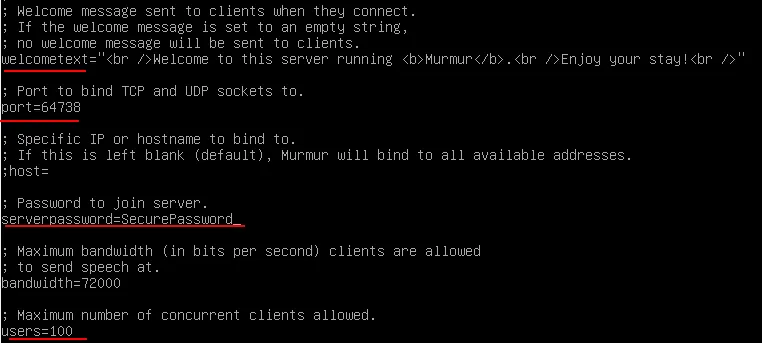
Navigate using the arrow keys or page up/down keys to find the line that says serverpassword=. Edit this line set a password for your server, make sure to use a strong one, new users will need to enter this password to join your mumble server.
You can also change the default port to make your server more secure. Find the line saying port= and set a new port (numerical, 0 to 65535). Make sure that no other services on your server is using this port and your firewall is set to allow for this port.
If you do not have a firewall setup yet, don’t worry, I will tell you at the end of this post how to set up a simple firewall on your server.
Edit the welcometext= to change the text that user sees on their login.
Also, don’t forget to change the value of users= to the max number of users that you want on your server. This depends on your needs and the load that the server can handle.
Save the file via CTRL+O and press enter, After that exit nano via pressing CTRL+X.
When back in the main terminal, type:
1
 sudo systemctl start murmur
to start your mumble server. You will need to do this every time your server reboots. Unless you type the command:
1
`sudo systemctl enable murmur`
to enable & automatically start the service on boot.
This should make your server ready to access given that you have followed all the steps and port forwarding is configured properly (if setting on your own Linux machine at home).
Tip: If the above commands do not work, try replacing murmur with mumble-server.
How to connect to your mumble server
Any client running Mumble (or its forks) regardless of the operating system can be used connect to your mumble-server/murmur instance.
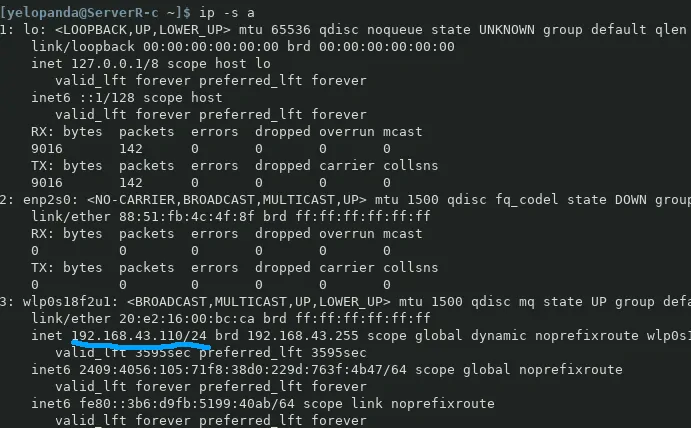
In order to connect, you will need to get the IP address of your server. If you don’t know the IP address of your server, login/ssh into your server and type this command:
1
ip -s a
The output will be something like this:
Other simple way is to use a simple curl fetch, if not already installed, type:
1
sudo apt install curl
Now you can type curl ifconfig.io in the terminal, it will only output a single line that will be the IP of your server.

Now you have your IP, open Mumble and add a new server.
Set your server label, IP address and port. The default port for mumble is 64738, replace it with your custom port (if any).
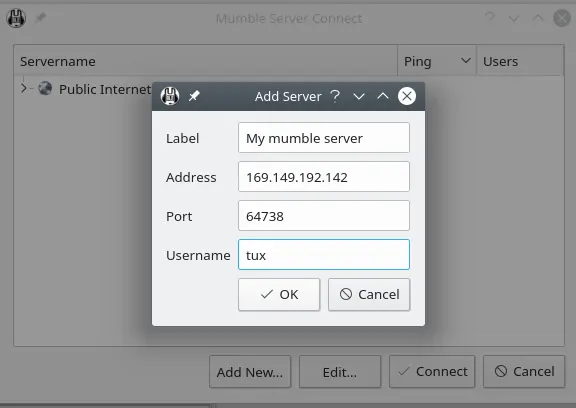
Enter your username and use the password that you set in the config file.
With this, you should have successfully joined your mumble server for the very first time.
Register on the mumble server
Login to your mumble server with your desired username. Then right-click on your name on the screen and select Register. Accept any prompt and you should now be successfully registered on the server.
Registering your username makes sure that no one else can use your identity on the server anymore. It also makes you eligible for the admin role.
Become the Admin of your Mumble Server
To control your mumble server and become an admin, you will first need to log into the SuperUser account.
Type this command in the terminal of your Ubuntu or Debian Machine where the server is setup. This will open a dialog box inside your terminal
1
sudo dpkg-reconfigure mumble-server
The first two options are for auto start, and priory of the mumble-server. In the third option you can setup password for the super user account. Choose a strong password and save it.
Now open your mumble client and login via the same IP address and port but change the user name to SuperUser (case-insensitive) and use the password that you just set.
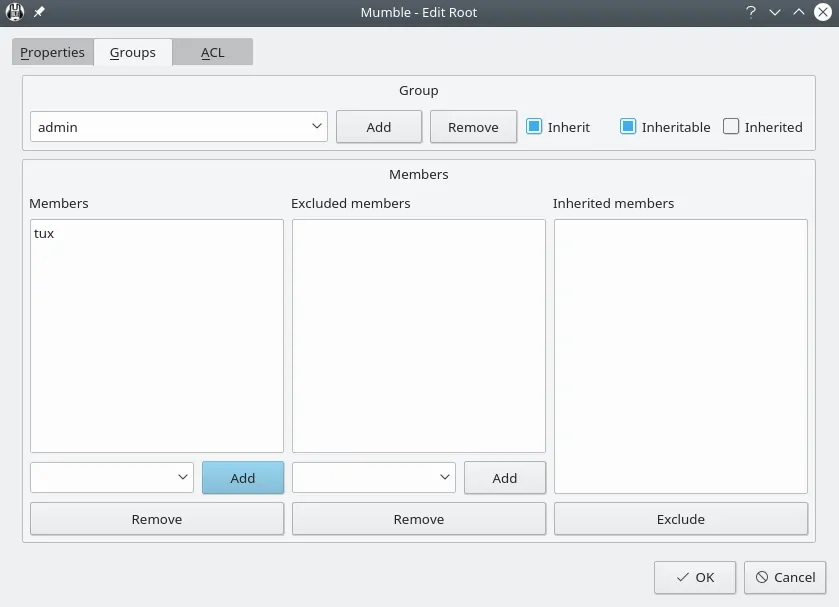
Right click on the top group (default name is root) and select edit.
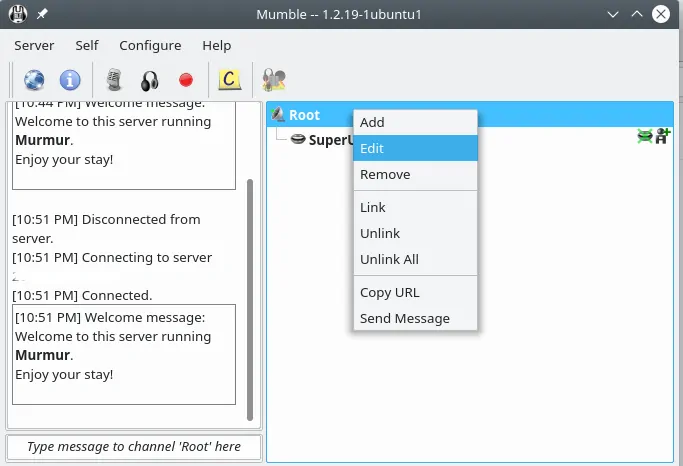
Switch to the groups tab and add/select the group admin from the drop down menu.
Now add the user that you want to make admin in the Members tab. Make sure that the username that you are trying to give admin privileges is already registered on the mumble server.
Now disconnect from the server and log back in using your username, you should now possess admin privileges.
Setting up a Simple Firewall on your Mumble Server
We will be using ufw here. UFW or Uncomplicated Firewall is exactly what its name says, a simple and easy to setup firewall.
UFW package is available in both official repo’s of both Ubuntu and Debian. To install it simply type
1
sudo apt insall ufw
Once this install, we will setup ufw in such a way that it only accepts incoming traffic from the mumble-server port and denies everything else.
By default, ufw is set to allow all outgoing traffic and deny all incoming traffic. We need to add our murmur (mumble-server) port to the ‘allow rule’ set of ufw.
Type these commands in terminal to allow mumble-server port in ufw, make sure to replace 64738 with your own custom port if you have changed the default port.
1
2
3
sudo ufw allow 64738/tcp

sudo ufw allow 64738/udp
Also, if you are connected via ssh (port 22), type sudo ufw allow ssh before enabling the firewall to avoid getting kicked out of your session.
(Note: If you are using your server for something else as well, for example a web server, you will also need to add rules for more ports such as 80,443, etc in ufw.)
Enable the firewall by executing:
1
sudo ufw enable
After that run sudo ufw reload to restart the firewall.
Type in sudo ufw status and check if the ports that you allowed are there.
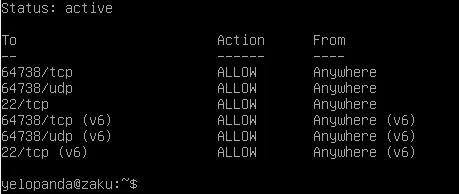
If the ports to your mumble server are set to ALLOW in ufw & you are able to connect to your server, that means you are good to go and the firewall has been successfully set up.
How much does it cost to self-host a Mumble Server?
It totally depends on your needs. You can host your mumble server on a cheap VPS with a single core and 1 gigabyte of ram.
This configuration can easily handle 10-20 people on the server at a time. The bottleneck here will not be the hardware but the internet bandwidth.
Where to Host a Mumble Server?
You can self-host a mumble server at your home but if you need to make sure that it stays online 24/7 and you don’t run out of internet bandwidth, the best option is to use a VPS.
You can give Linode a try. They have VPS plans for as low as 5$/month and have servers all around the globe. If you decide to sign up for Linode using the referral link above, you will get a 20$ credit when you sign in.
This is it for this post, I hope by now you have successfully installed mumble server on your Debian or Ubuntu machines and it is up and running.
Check other similar articles on my site and leave a comment down below if you need any help.