How to Enable SSH on Ubuntu 20.04 (+ Configuration)

In this short tutorial, I will show you how to enable ssh on your Ubuntu Machine and also how to configure it.
To be able to remotely connect to your Ubuntu machine, a ssh server is required. If you are using the latest version of Ubuntu, chances are that you have the ssh client installed, but not the ssh server.
To install ssh server, open the terminal app and type in:
1
sudo apt install -y openssh-server
If prompted, type in your password to initiate the install.
The installation should now be complete, and we can proceed to the next step, that is enabling the ssh server.
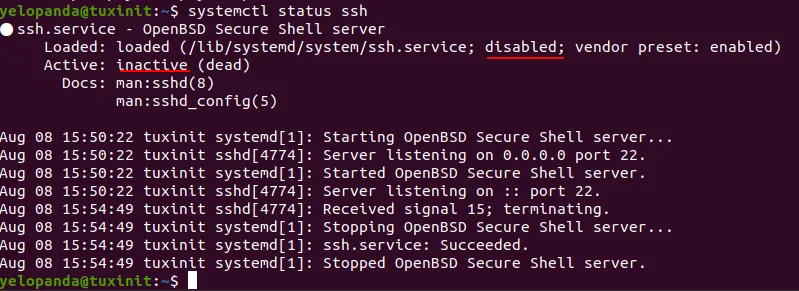
First, check the current status of openssh server by typing this in terminal:
1
sudo systemctl status ssh
If it says that the service is active and is already enabled then we dont need to do anything else.
1
2
3
4
5
6
7
8
9
10
11
12
13
14
15
16
17
yelopanda@tuxinit:~$ systemctl status ssh
● ssh.service - OpenBSD Secure Shell server
     Loaded: loaded (/lib/systemd/system/ssh.service; enabled; vendor preset: enabled)
     Active: active (running) since Sat 2020-08-08 15:50:22 IST; 22s ago
       Docs: man:sshd(8)
             man:sshd_config(5)
   Main PID: 4774 (sshd)
      Tasks: 1 (limit: 4656)
     Memory: 1.2M
     CGroup: /system.slice/ssh.service
             └─4774 sshd: /usr/sbin/sshd -D [listener] 0 of 10-100 startups

Aug 08 15:50:22 tuxinit systemd[1]: Starting OpenBSD Secure Shell server...
Aug 08 15:50:22 tuxinit sshd[4774]: Server listening on 0.0.0.0 port 22.
Aug 08 15:50:22 tuxinit systemd[1]: Started OpenBSD Secure Shell server.
Aug 08 15:50:22 tuxinit sshd[4774]: Server listening on :: port 22.
But if it states that the service is inactive (check the screenshot below) then we will have to start and enable it.
 To start & enable ssh service, type(in Terminal):
1
sudo systemctl start ssh
And also type:
1
sudo systemctl enable ssh
The first command starts the ssh service, while the second one enables the service so it gets started when the system boots.
This should have enabled ssh on your Ubuntu Linux install and you can now connect to it via a terminal or software like puTTY.
Allowing SSH port in Firewall
In Ubuntu, the firewall software that comes preinstalled by default is called ufw. It is very easy to set up and use.
By default, it comes disabled in Ubuntu, but if you are using it, you have to allow port 22 (default ssh port) through ufw.
First run this command to check if ufw is enabled or not.
1
systemctl status ufw
Then, to allow ssh through ufw, open a terminal window and type:
1
sudo ufw allow ssh
Next, run the following command to restart the firewall. While not necessary, it is recommended to do so.
1
sudo ufw reload
Editing the sshd Config File
sshd_config is the name of configuration file for ssh server and is located in /etc/ssh/ folder.
There are a lot of options that we can change in this file, such as setting the port, listening addresses, X11 forwarding, various authentication options and more.
To change the default ssh port, open the config file in nano:
1
sudo nano /etc/ssh/sshd_config
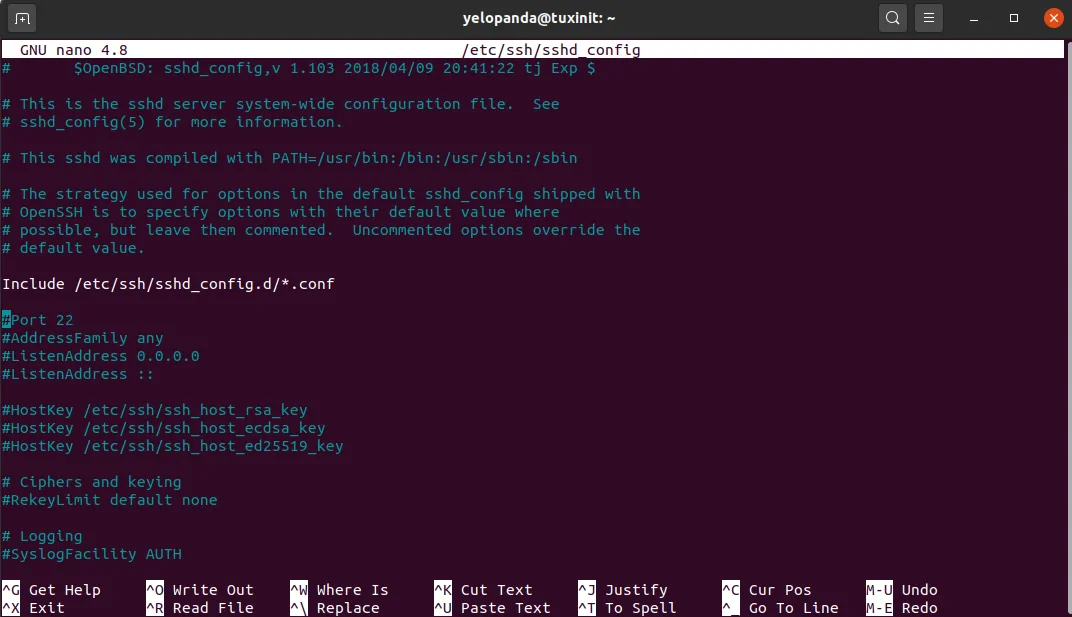 Uncomment the line (remove the hash) that says Port 22 and replace 22 with the new port value. Remember to use a valid port and one that is not is use by any other service/software in your network.
When editing the file, proceed with caution as it can cause various problems for you, including connection issues.
Connecting to your Ubuntu Machine via ssh
Once we have enabled the openssh-server and allowed it through the firewall, we can proceed to the final step, that is connecting to our Ubuntu install via ssh.
If the other machine (from where you want to connect) is also on the same network, you can use the local IP address (also called Private IP) to connect to your computer.
To get the local IP in Ubuntu, open a terminal and type in:
1
ip -s a
Note down the IP address, it should be something like 192.169.43.***.
If you want to be able to ssh into your machine from Internet (i.e. from devices that are not on your local network.), you will have to enable port-forwarding. So in order to connect to your machine via ssh over internet, you will need to forward the specified port (by default ssh uses port 22) in your router.
Because each router has a different setting for port-forwarding, we suggest that you refer to your router’s manual for the instructions.
Next thing that you need to find is your public IP address. To do so, open a terminal and type this command:
1
curl ifconfig.io
(Note: If it says curl not found, you need to first install curl via typing sudo apt install curl)
SSH’ing via a Terminal
Once you have the IP address, hop on to another computer connected to the same network as your Ubuntu machine. Open a terminal window there and type:
1
ssh user@192.168.43.110 -p 22
Note: replace ‘user’ with your own username, 22 with the port, and also change the IP address at the end.
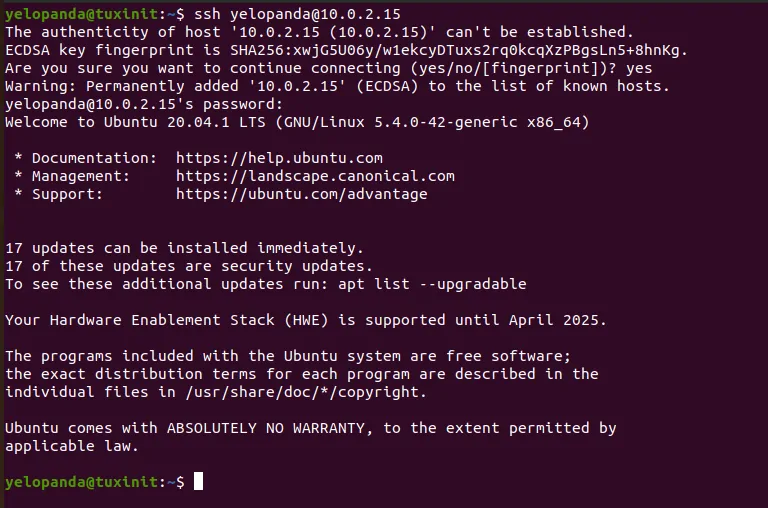 If your other machine is also running Linux, you will first need to verify the fingerprint of the device by entering ‘yes’ on the terminal.
After that, when prompted, enter the password and you should be connected to your Ubuntu Machine via ssh.
Conclusion
This concludes my post on how to enable and configure ssh on Ubuntu based systems. You can also follow this tutorial if you are using Ubuntu derivative distro’s such as Kubuntu, Lubuntu Xubuntu etc.
Check out this tutorial on How to Set up a simple firewall in Linux. It explains about ufw and how you can set it up easily with command line or GUI.
Leave a comment down below if you are having trouble following the tutorial, I will try my best to help you out.