How to Encrypt a Disk or Partition in Linux (Is it Worth It?)
Encryption is a great technology. It adds a extra layer of security to your system and can save your precious data from unauthorized access.
Here in this short post/tutorial we will discuss how to encrypt your Linux drive or partition and if it is worth the hassle or not.
How Does Disk Encryption Work in Linux? Linux uses LUKS (Linux Unified Key Setup) encryption to perform disk encryption. LUKS is an standard utilty that comes preinstalled in almost all Linux OS’es.
How to Encrypt a Disk or Partition in Linux Using Crpytsetup (CLI)
Step one is to Install crpytsetup. Cryptsetup is available in official repos of all the major Linux distributions including Debian, Ubuntu, Arch Linux, Fedora, CentOS, and their derivatives.
To install it, simply use these commands.
On Debian/Ubuntu, type:
1
sudo apt install cryptsetup
In Arch Linux/Manjaro:
1
sudo pacman -S cryptsetup
On Fedora/CentOS/RHEL:
1
sudo yum install cryptsetup-luks
Next we will need to format our drive/partition in order to encrypt it.
Please note that with this next command, all of your data on that particular disk/partition will be gone! so proceed with caution and make backup if necessary.
Type in console or terminal:
1
sudo cryptsetup luksFormat /dev/sdc
Replace /dev/sdc with your drive or partition. e.gUsing /dev/sdc will encrypt the entire sdc drive, while typing /dev/sdc2 will only encrypt the 2nd partition of sdc drive.
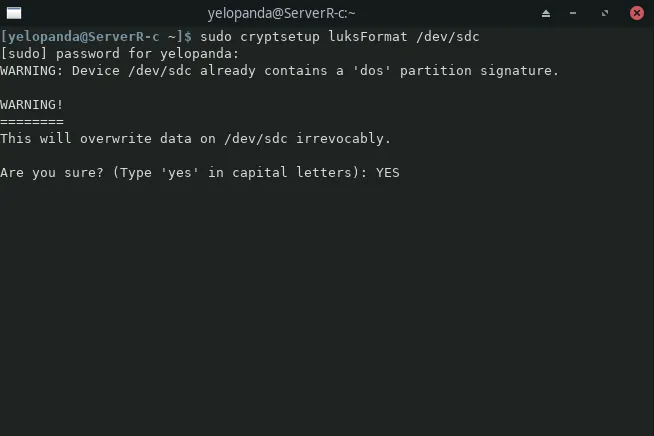 A warning will now show on your screen telling you to confirm your actions by typing yes in all caps.
After that you will prompted to enter a password for your new encrypted drive, make sure to use a strong password.
Tip: Most Terminals in Linux don’t show a password being typed in.
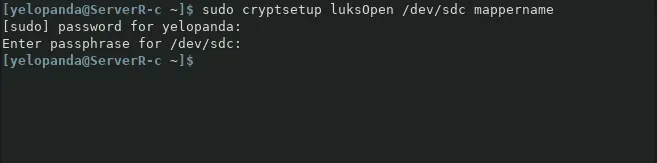
The encryption is now done but in order to access our drive, we need to type in:
1
sudo cryptsetup luksOpen /dev/sdc mappername
When asked, use the password that we created for the encrypted drive.
 Use
Use lsblk command to check the status and see if the drive is mounted or not.
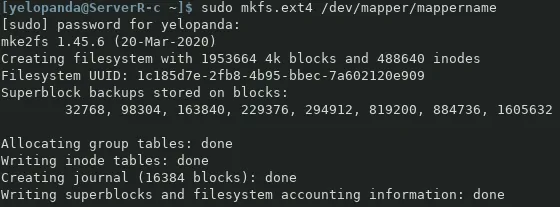
 And then type the following command to format the luks partition so that we can access it.
1
sudo mkfs.ext4 /dev/mapper/mappername
 You can now access the disk as a password-protected drive if you are using a GUI based file manager.
For mounting the drive using Command Line Interface, type in these commands one by one:
1
2
3
4
5
sudo mkdir /mnt/mydrive

sudo mount /dev/mapper/mappername /mnt/mydrive

lsblk
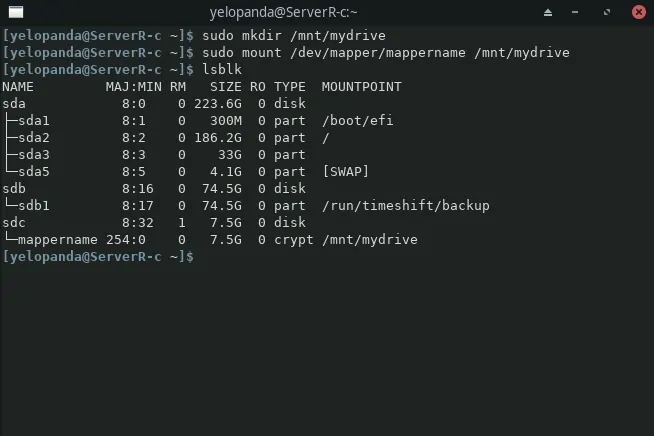 The first command will make a directory where we can mount our drive. The second one will mount the encrypted luks drive to the designated directory. And the last one will show all the drives connected to your system.
(Note: sudo is only needed if you are not using the root account.)
Your encrypted disk/partition should now be ready to use.
Getting permission denied errors when trying to copy files to the drive? If yes then you need to change the ownership of the drive.
We can use the chown command to do so, type in:
1
chown yelopanda:yelopanda /mnt/mydrive/
Replace yelopanda:yelopanda with your username and your group name (user:group).
Using Gnome Disk Utility (GUI)
Gnome Disks is a GUI Disk management tool using which we can easily create a encrypted disk/partition on Linux.
To encrypt the whole disk, select the disk drive from the left-side menu and delete all the partitions on the disk. You can do so by selecting the partition and clicking the minus(–) button. Keep in mind that all the existing data on that disk will be gone!
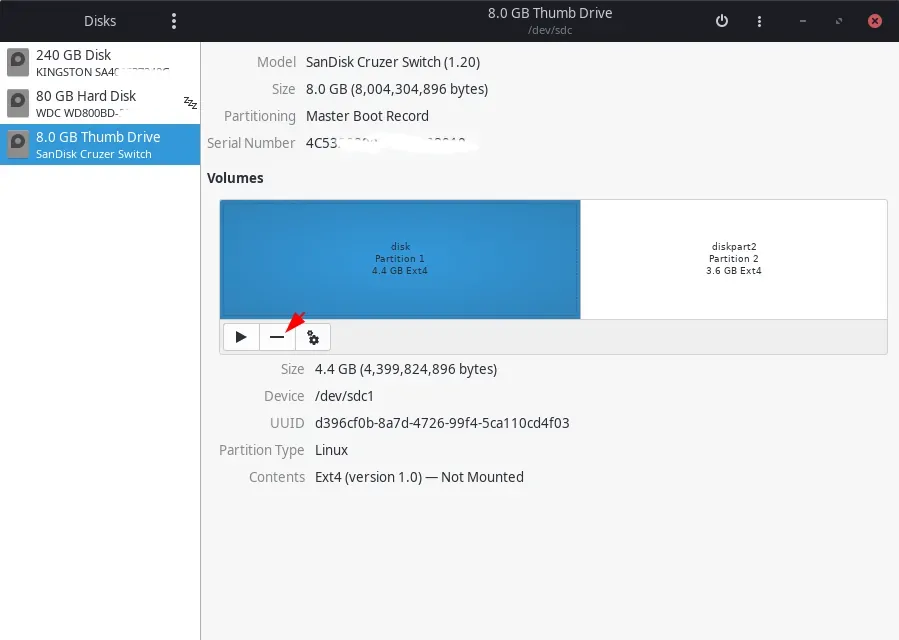 After doing this for all the partitions (OR for a single partition that you want to encrypt), select the free space and click the plus(+) icon.
 On the next dialog box select the new partition size, leave it as is if you want to utilize all the free space.
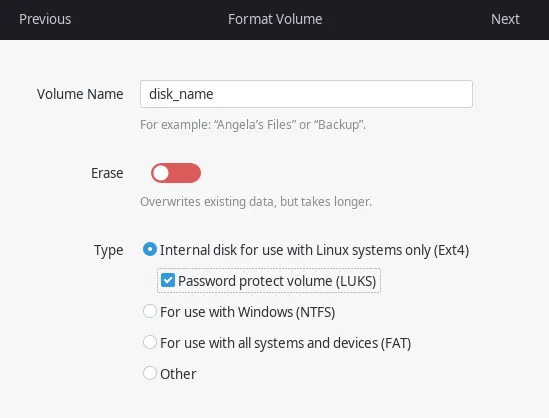
On the next screen, select ext4 option and tick password protect volume (LUKS). You can also enable the Erase option for extra security. It will overwrite the disk with zeros and ones thus making previous data that was on the disk unrecoverable. This option will consume a lot of time tho.
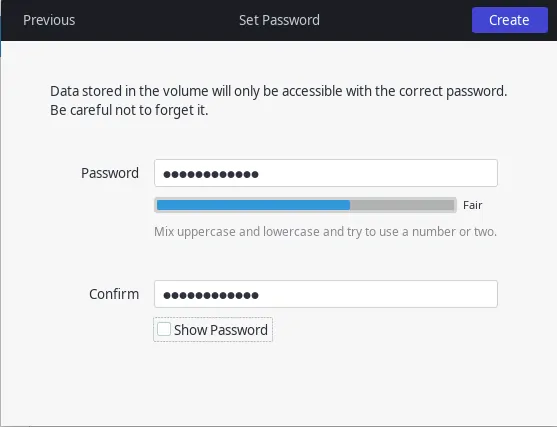
 Click next and set a password for your drive. Remember to use a strong password. If your password is as simple as 123 or qwerty, then encryption will serve you no good.
 Once done hit next and the process should start. Once finished you will see your encrypted disk or partition in the Gnome Disks menu. Hit the little lock to lock or unlock the disk.
You can now access your drive via your file manager and start putting files in it.
Note: Some Linux distributions can also prompt you to save password for easy access. While can be useful for external drives and thumb drives, doing it so for internal drivers is not recommended as anyone with access to your computer will now also have access to your encrypted drive.
Does Encrypting your Disk Makes sense?
It totally depends on the users and their needs.
For example if you own a laptop or a similar compact Linux system then it makes sense to have a encrypted drive in your system. You can put all your important data in that drive/partition and even encrypt your Linux install.
The above is also true for your desk computer and your personal Linux machines.
However, encrypting your entire Linux install on your old 2 core personal system does not make any sense.
As the hardware is already dated and slow and decrypting your whole OS at boot is only going to make your system struggle more and slow down.
In this case you can just encrypt a small partition of your disk and store your valuable info there.
Conclusion
This concludes my tutorial on how to encrypt your disk/drive/partition in Linux. I hope you were able to follow along and now have a secure way to store your data.
While LUKS encryption is good and all, it does have some downside, the biggest one being the compatibility. While it works out-of-the-box for Linux based systems, support for Windows & Mac is not great, especially if you have formatted your LUKS drive (or partition) in a format such as ext4.
Thanks for reading, leave suggestions and your thoughts on this tutorial in the comments down below.