Find All the Connected Devices on Your Network in Linux
Want to know what other or how many devices are connected to your network? Here in this tutorial, I will show you how you can easily find who is connected to your network. And not only their IPs, but you can get some other information such as their MAC address, opened ports on their devices and OS info as well.
By scanning your network, you can assure that only people who are supposed to be on the network are connected and there are no bandwidth hogs and potential threats on your network, lets get started. For this tutorial, we will be using nmap.
What is Nmap?
Network Mapper or nmap as it is commonly known is a free and opensource network scanning utility that lets you find devices connected on a specified network and their details such as their assigned IP on the network, open ports, OS details, and more.
Installing Nmap
Nmap is available in the default repositories in most of the Linux distributions, you should not have any trouble installing it. It can easily be installed by typing a simple command in the terminal.
For Ubuntu/Debian based distributions, type:
1
sudo apt install nmap
Arch Linux (& Artix, Manjaro, etc.):
1
sudo pacman -S nmap
For Fedora:
1
sudo dnf install nmap
CentOS:
1
sudo yum install nmap
Once nmap is installed, the next thing that we need to do is to find the local IP range of our network.
In Linux we can use the ip command to do so, this command will let us find our private/local IP address which we can use to find the range.
Open a terminal window and type:
1
ip a
The output will be something like this:
1
2
3
4
5
6
7
8
9
10
11
12
13
14
15
16
17
18
[yelopanda@ServerR-c ~]$ ip a
1: lo: <LOOPBACK,UP,LOWER_UP> mtu 65536 qdisc noqueue state UNKNOWN group default qlen 1000
    link/loopback 00:00:00:00:00:00 brd 00:00:00:00:00:00
    inet 127.0.0.1/8 scope host lo
       valid_lft forever preferred_lft forever
    inet6 ::1/128 scope host
       valid_lft forever preferred_lft forever
2: enp2s0: <NO-CARRIER,BROADCAST,MULTICAST,UP> mtu 1500 qdisc fq_codel state DOWN group default qlen 1000
    link/ether 88:51:fb:4c:4f:8f brd ff:ff:ff:ff:ff:ff
3: wlp0s18f2u1: <BROADCAST,MULTICAST,UP,LOWER_UP> mtu 1500 qdisc mq state UP group default qlen 1000
    link/ether 20:e2:16:00:bc:ca brd ff:ff:ff:ff:ff:ff
    inet 192.168.43.111/24 brd 192.168.43.255 scope global dynamic noprefixroute wlp0s18f2u1
       valid_lft 2354sec preferred_lft 2354sec
    inet6 2401:4900:30b5:84b:6e30:5e8a:1ffa:54fc/64 scope global noprefixroute
       valid_lft forever preferred_lft forever
    inet6 fe80::939c:1c17:8695:9db1/64 scope link noprefixroute
       valid_lft forever preferred_lft forever
In this line, you can see that:
1
inet 192.168.43.111/24 brd 192.168.43.255 scope global dynamic noprefixroute wlp0s18f2u1
I am connected to wifi using the device wlp0s18f2u1, and my ip address is 192.168.43.111.
It also states that wifi router’s broadcast (brd) address is 192.168.43.255.
Meaning my network can assign new devices IP from the range 192,168.43.0 – 192.168.43.225.
Scanning Network Using Nmap
Now we have our IP range, we can begin the scan. To do the scan we need access to a terminal (scroll down for the GUI method), most mainstream Linux distributions come with one these days.
On Ubuntu you will find gnome-terminal, on KDE desktop environment there is Konsole, for XFCE there is xfce-terminal and so on. You can also use a tty or an ssh client.
In the terminal, type:
1
nmap -T4 192.168.43.0/24
Output:
1
2
3
4
5
6
7
8
9
10
11
12
13
14
[yelopanda@ServerR-c ~]$ nmap -T4 192.168.43.0/24
Starting Nmap 7.80 ( https://nmap.org ) at 2020-09-03 22:45 IST
Nmap scan report for sakura (192.168.43.17)
Host is up (0.0057s latency).
All 1000 scanned ports on sakura (192.168.43.17) are closed

Nmap scan report for ServerR-c (192.168.43.111)
Host is up (0.00022s latency).
Not shown: 999 closed ports
PORT   STATE SERVICE
22/tcp open  ssh

Nmap done: 256 IP addresses (2 hosts up) scanned in 17.90 seconds
Here you can see that nmap has found 3 devices on my network. The ServerR-c (192.168.43.111) is my main computer that I am writing this tutorial from and sakura (192.168.43.17) is my laptop that is connected on the same network as my main PC.
Nmap has detected both devices who are connected on my network successfully, lets try the Operating System Detection feature as well.
Note: OS detection in nmap requires root privileges, you will need to run nmap with sudo.
Type:
1
sudo nmap -T4 -O 192.168.43.0/24
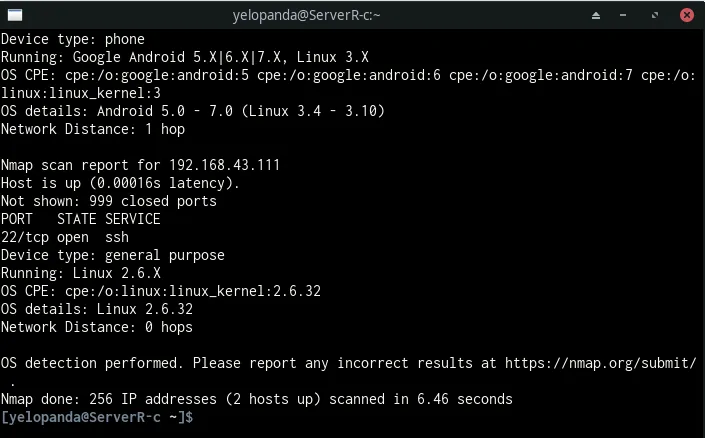 While nmap is having trouble here with the Linux version of Device (Linux 2.6 xD), it has successfully detected the Operating system (Linux) of my PC (ServerR-c) and interestingly, this time it has also picked my phone that I am using as the wifi hotspot.
Scanning for Open Ports
When you run a normal scan, nmap automatically scans for open ports as well. If a host on the network has open port, it will list it.
1
2
PORT   STATE SERVICE
22/tcp open  ssh
If you want to search for a single port, or for ports in a specific range, you can do that as well in nmap. Use these commands as an example.
example1:
1
nmap -T4 -p22 192.168.43.0/24
The above command will search for port 22 (default ssh port) on the IP range 192.168.43.0 – 225.
example2:
1
nmap -T4 -p15-777 192.168.43.0/24
This command will search for port 15 to port 777 on the IP range 192.168.43.0 – 225.
There you go, this was for the nmap cli software now lets move on to the GUI. It is similar to the CLI nmap but just has some extra bells and whistles.
Using Zenmap (Nmap GUI)
Zenmap is the official GUI for Nmap. To find devices on the network using zenmap install the package and run it as root (recommended as some features does not work unless you run it with elevated privileges.)
Now get the local ip address of your system using the command ip a, then replace the numbers after the final dot to 0/24, paster it in the target box and hit scan.
For example, if you ip address is 192.168.43.111, then in the zenmap’s target box type: 192.168.43.0/24.
 If you want to find addition information about host devices, you can use the filters/profiles. For example using the filter Quick Scan Plus, you can find info about the host’s operating system and device details.
GUI applications are good for beginners and for people who are not very familiar with CLI (Command Line Interface). But in the case of nmap, I would recommend that you use the command line as it is very easy to perform a simple scan using a terminal.
The reason is that zenmap is not available in the base (default) repositories of many Linux Distributions; and the only binary that nmap’s website provides for Linux is in rpm format (rpm is for RHEL, CentOS, Fedora, etc.). So you are left with the option to compile the program from its source.
However, if you are using any Arch Linux Based Linux OS and have access to aur, you can grab the zenmap package with the help of your favorite aur helper.
Conclusion
This concludes this tutorial, I hope you were able to find what you were looking for, especially that pesky little one on your network causing you problems.
I have tried my best to simplify the process for you but if you still didn’t get something you can ask for it in the comments down below. And as always, any suggestion, feedback or comment on this post is welcome.