How to Disable SELinux in CentOS/Rocky Linux 8
Security-Enhanced Linux or SELinux in short is a security mechanism built into Linux kernel. All recent versions of CentOS like CentOS 8, SELinux comes enabled by default.
While it is a great security feature, it can affect your connectivity if not configured properly or is not compatible with your network settings. Managing ports can also become a headache with SELinux set on enforcing mode.
Here in this short tutorial, I am going to show you how to disable SELinux on CentOS 8 Linux, and also on other derivatives of CentOS like Rocky Linux and AlmaLinux. This guide is easy to follow and doesn’t require much technical knowledge of Linux.
You just need to know how to access the terminal. It you have a CentOS 8 server, then most probably you are using ssh and software like putty to connect to your server.
Just login via ssh and paste the given commands in the terminal window.
Note: sudo is required in if not using the root account. e.g. instead of just writing sestatus, you will use sudo sestatus.
Checking status of SELinux
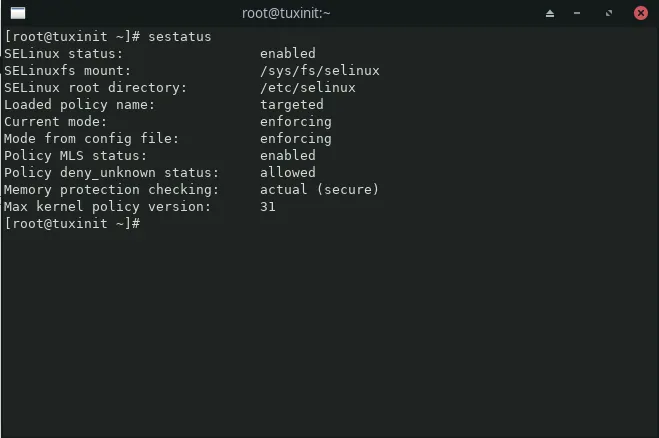
First we will need to check the current status of the SELinux. There are three states that SELinux can be in, enforcing (enabled), permissive (disabled until reboot) & disabled. In terminal, type:
sestatus
If SELinux is enabled, you output will be something like this:
 Once it is confirmed that SELinux is enabled, we can proceed to disable it.
Now we have two options here, either we can disable SELinux temporarily, meaning it will stay disabled until the next reboot, or we can disable it completely.
Disabling SELinux Temporarily
To disable SELinux until next reboot, type this command in a terminal window:
1
setenforce 0
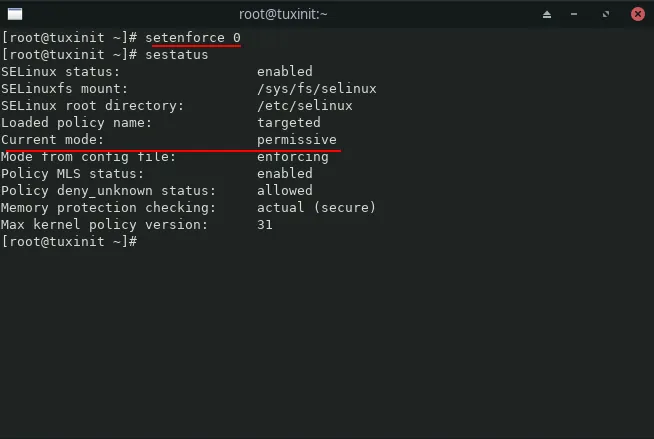 Once done, SELinux will stay disabled (in permissive mode) until you reboot the system. It is just a quick solution if you only need SELinux disabled for the current session only.
Disabling SELinux Permanently
In order to disable SELinux permanently, we need to open its config file and change some settings. Type in:
1
nano /etc/selinux/config
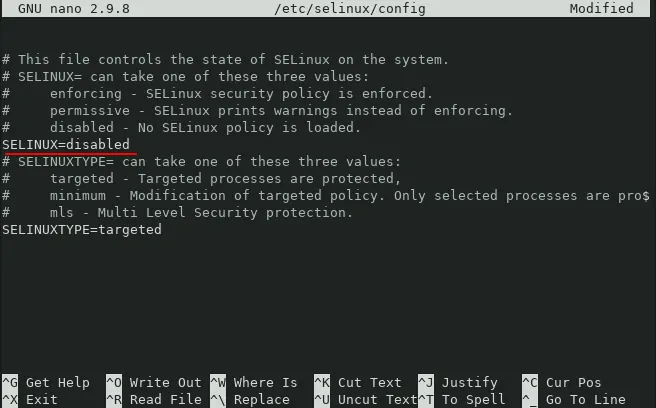 This will open the config file in the nano editor. Change the line “SELINUX=enabled” to “SELINUX=disabled”. Save the file with Ctrl+o (or Ctrl+s) and close the nano window.
For the changes to take effect, restart the system by typing reboot in the terminal.
After reboot run sestatus command to verify that SELinux has been disabled.

Conclusion
This concludes my tutorial on how to disable SELinux on CentOS 8. The reason why I decided to write this post is that in one of my CentOS 8 machines, I was facing some errors. While trying to allow traffic thorough particular ports.
I tried everything that I can but in the end I decided that SELinux was not worth the hassle, at least for me.
I wrote guide while keeping CentOS 8 in mind but you can use the same steps to disable SELinux in CentOS 7 or other derivatives of CentOS.