How to Install TeamSpeak Server on CentOS 7/8

Teamspeak was one of the first VoIP programs to hit the computer space. Even to this day, it still remains one of the top voice chat apps available. It is easy to use, has tons of useful features in-built and even has support for plugins.
Unlike the modern VoIP apps, teamspeak does not provide you with server. While there are public servers that you can join, you cannot simply create your own private chat rooms and invite others.
There are many websites out there which provide teamspeak servers. You can also however, host your own servers which is more secure and cost effective.
Here in this tutorial I am going to show you how you can host & install your very own teamspeak server in CentOS 7/8.
Note: In case you are not using the root user, sudo will be required in front of some of the commands. (e.g. sudo mkdir /var/teamspeak-server)
How to Install TeamSpeak Server on CentOS 7/8
First, we will need to create a directory for teamspeak server to reside and work in. Type in:
1
cd && mkdir /var/teamspeak-server
Now create a group and a user that will handle the service for Teamspeak server.
1
2
3
groupadd -r tsserver

useradd -r -g  tsserver -m -d /var/teamspeak-server -s /sbin/nologin tsserver
Next, give ownership of the directory that we previously created to the tsserver user:
1
chown tsserver:tsserver /var/teamspeak-server
We can now move forward and download the TeamSpeak server package. To do so, type this command in the terminal:
1
wget https://files.teamspeak-services.com/releases/server/3.13.6/teamspeak3-server_linux_amd64-3.13.6.tar.bz2
Note: Please check this page for the latest version of TeamSpeak Server and change the command above accordingly.
Next, we will need to extract the package.
1
tar -xf teamspeak3-server_linux_amd64*
Tip: When typing the name of a file in terminal, you can always type the first few words and then press Tab to autocomplete the filename.
Once extracted, we will need to copy the contents into the directory that we just created for teamspeak server.
1
cp -r teamspeak3-server_linux_amd64/* /var/teamspeak-server/
Accepting TeamSpeak 3’s License Agreement
After the release of TeamSpeak 3.1.0, it is required to accept a license agreement in order for a teamspeak server to work. If you want to read the related document, you can find it in a file called “LICENSE” under the operating folder of teamspeak, “/var/teamspeak-server” in our case.
to accept the lisence, we need to create a file called .ts3server_license_accepted in the working directory of ts. Use this command to do so:
1
touch /var/teamspeak-server/.ts3server_license_accepted
Creating a System Service to Manage our TS Server
Now we will create a systemd service for the teamspeak server, it will allow us to control and monitor the TeamSpeak server with ease.
First, use nano to create a new file named tsserver.service (name that we are assigning to the teamspeak server service).
1
nano /lib/systemd/system/tsserver.service
Now paste this code into the nano window and save (Ctrl+O).
1
2
3
4
5
6
7
8
9
10
11
12
13
14
15
16
[Unit]
Description=TeamSpeak Server
After=network.target

[Service]
user=tsserver
group=tsserver
WorkingDirectory=/var/teamspeak-server/
ExecStart=/var/teamspeak-server/ts3server_startscript.sh start inifile=ts3server.ini
ExecStop=/var/teamspeak-server/ts3server_startscript.sh stop
PIDFile=/var/teamspeak-server/ts3server.pid
RestartSec=15
Restart=always

[Install]
WantedBy=multi-user.target
We are now done with configuring the teamspeak server. Next, we will need to set up the default firewall (firewalld) that CentOS 7/8 comes with.
Setting up Firewall to Allow the Ports for TS Server
We will set the firewall to allow ports that teamspeak server uses. Type these lines one by one in the terminal/console:
1
2
3
4
5
6
firewall-cmd --permanent --zone=public --add-port=10011/tcp

firewall-cmd --permanent --zone=public --add-port=30033/tcp

firewall-cmd --permanent --zone=public --add-port=9987/udp
We will now need to restart the firewalld service in order for the changes to take effect.
1
firewall-cmd --reload
You can now go ahead and start the teamspeak server. Type:
1
2
3
systemctl start tsserver.service

systemctl enable tsserver.service
The first command will start the service while the second one will enable it so that the teamspeak server can start with every boot.
This is it, your ts server should now be up and running.
Conencting to your TeamSpeak Server
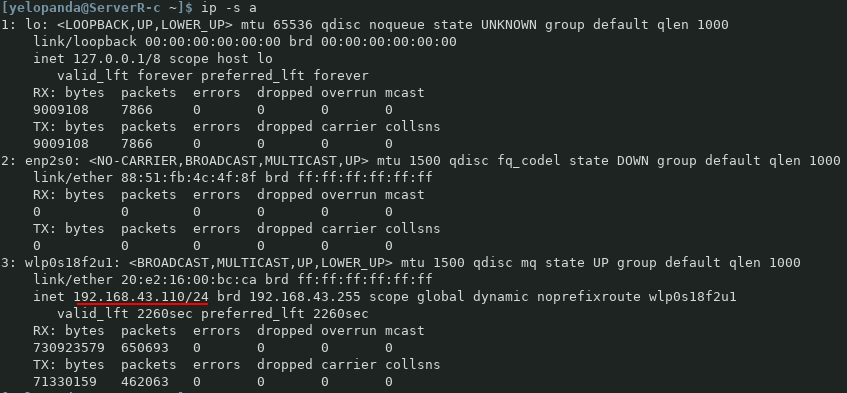
In order to connect to your server, you first need to find the IP address of your server. Most VPS providers give this information when you create your server. You can also use the command ip -s a to get your server IP. The output will be something like this.
 You can also type
 curl ifconfig.io in your terminal, it only outputs the IP address of your server.
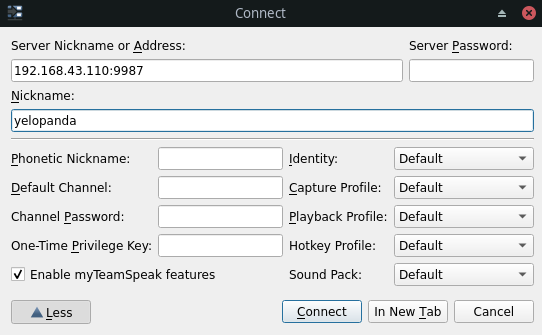
Once you have the IP address, open the teamspeak client, click on connections and select connect.
Enter your desired nickname and in the server address text field enter your server’s IP and teamspeak port in this format:
192.168.43.1:9987
(Note: Replace 192.168.43.1 with your servers/VPS IP.)
 Now Click on the ‘More’ and in the One-Time Privilege Key option use the token key. To know how to obtain your own privilege key, check the process of Gaining Admin Privileges below.
You should now be connected to your ts server.
Getting Connection Refused Errors when connecting to your teamspeak server? Maybe you have not set up your firewall properly, scroll back up and check the firewalld section.
This type of error can also occur when your hosting/VPS provider has certain ports blocked. In this case you can contact your service provider and ask for assistance.
Gaining Admin Privileges
To gain admin privileges, we will need to fetch a key from the logs of our teamspeak server. Type this command in your server’s terminal:
1
cat /var/teamspeak-server/logs/* | grep -i token
the output will be similar to this:
2020-07-05 08:28:06.947931|WARNING |VirtualServer |1 |token=QatCsIifyXISaw3EhhrAAtyx8pTDQdlLjuA8cf8E
Note down the value of the token and use it when you login to your server for the first time. The user you have logged in with should now posses the admin rights.
Cleanup
Once we are done with the install we can proceed to clean the files and archives which we no longer need. Type in:
1
cd && rm -rf teamspeak3-server_linux_amd64*
To check the status of your teamspeak server, you can use the command:
` systemctl status tsserver.service`
Also if you are facing any Permission Denied errors when trying to execute the commands, make sure that you are logged in as root OR if not the root user, have sudo in front of the commands.
( e.g. sudo nano /lib/systemd/system/tsserver.service)
This is it for this post, hope you were able to properly setup your TeamSpeak Server and are now ready to chat with your buddies with crisp, clean, & low-latency audio.
If you are not a fan of teamspeak, check out this post on how to install mumble server in CentOS.
Comment down below if you are facing any problems or have suggestions for this post.