How to Install Arch Linux, Simple Guide 2025

Arch Linux is one of the most popular distribution among Linux enthusiasts. It is a rolling release distro which provides you access to the latest Linux kernel & bleeding-edge software.
The reason why it is popular among Linux user is because it is so much more customizable than other Linux distributions and you have more control your system.
AUR or Arch User Repository is also a reason for Arch’s popularity. It is software repo where user can submit their own software and build files for various Linux packages, it allows users the access to thousands upon thousands of programs that are otherwise hard to get on Linux.
Here in this tutorial, I will show you how to install Arch Linux. It is a step-by-step guide that you can follow to successfully install Arch Linux on your System.
Before you proceed with the installation, check if you/your system meet these requirements:
1. Free storage space, I recommend 30gb if you plan to use it as your default OS.
2. Enough resources on your system, at least a dual core CPU and 2 gigs of ram recommended.
3. A flash drive to flash the Arch Linux ISO on.
4. A working internet connection.
5. Basic knowledge of the command line interface.
An Important Notice:
For the sake of simplicity and ease of understanding, I will be doing the installation on an empty disk drive with no important data. If you plan to follow this guide, please review the instruction in the “Preparing Your Drive for Install” carefully, as you can very easily erase your partitions and lose all of your data.
Also, as most of the computers support UEFI these days and the advantages of UEFI over legacy bios, the installation process is written with the focus on UEFI systems.
With this out of the way, lets get started.
Flashing the ISO
First, we need to download the Arch Linux ISO, click here to visit the Downloads page of Arch Linux’s website.
Once the ISO file has been downloaded and verified, we can proceed to the next step that is flashing the Arch ISO to a portable drive. You can use a thumb drive for this.
If you are already using a Linux Based OS/Distribution, you can use the dd command to flash the ISO to the thumb drive. If for some reasons you want to use a GUI app to do so, balenaEtcher is one of the best one out there for Linux.
Both on Windows & Linux based systems, you can use a utility called Balena Etcher. It is very simple to use and can flash an ISO file with a couple of clicks.
On linux you can also use the dd command:
Open a terminal and type in:
1
sudo dd if=/home/user/Downloads/archlinux-2020.08.01-x86_64.iso of=/dev/sdb status=progress && sync
if (input file) represents the path to the arch iso and of (output file) is the device id of your installation media (flash drive). You can use lsblk command to get the name (id) of your flash drive.
Change the if= and of= values with path to your iso file (if), and your devices location (of).
Please be careful when using dd and recheck your output file value(of=). It only takes a few wrong words for it to go from “Disk Duplicator” to “Disk Destroyer”.
Booting from the Flash Drive
Insert the installation media/flash drive to the computer where you want to install Arch Linux and power it on.
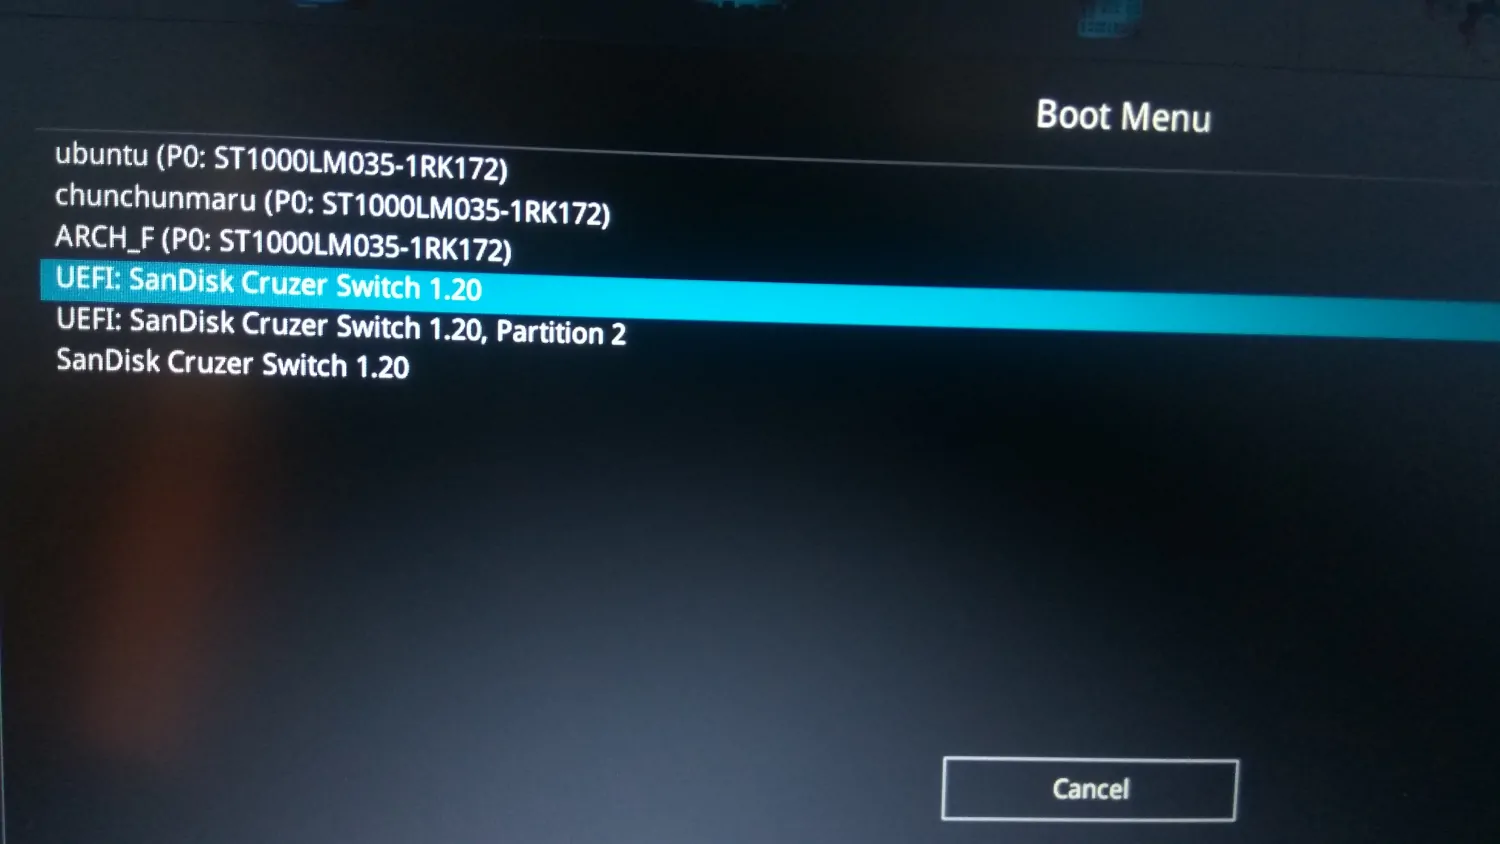
To get into the boot menu, you will need to press the Esc key or one or the function keys repeatedly. The key you need to press is specif to your motherboard manufacturer, you can do a quick search to find it or refer to the motherboard’s manual.
Once you are in the boot menu Select the UEFI boot entry for your flash drive. You should have successfully booted into Arch Linux Installer now.
Again, we will be installing Arch Linux on an UEFI system, so before proceeding, make sure that your system supports UEFI and you have indeed booted into the Arch installation flash drive using UEFI.
To check this, type the following command in the terminal that is in front of you now:
1
ls /sys/firmware/efi/efivars
The output should display a bunch of files, like this:
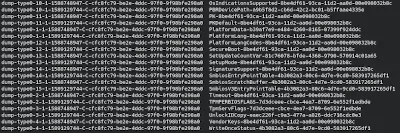 If the output says:
1
ls: cannot access '/sys/firmware/efi/efivars': No such file or directory
It means that either your system does not support UEFI (very unlikely as most modern systems from ~2012 and later support UEFI) or you have booted into the system using Legacy Bios.
If it is the latter, You will need to restart the system with the Arch Installation Drive attached, go into the boot options and select the UEFI option for your thumb drive.
Getting The Internet Working
If you are connected to Internet via an Ethernet cable, you should be good to go, no further configuration should be needed to get internet working.
But if you want to connect via a WiFi network, you can use the iwctl utility.
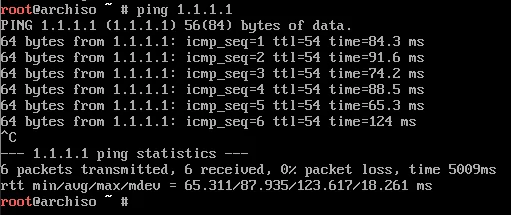
Once done, verify that you have Internet access by pinging a server or website.
1
ping 1.1.1.1
Preparing a Drive for Install
Now that you have verified that your system
- Supports UEFI
- Has Internet access
We can move onto the next step that is preparing a drive for installation.
First, make sure that the drive you want to install Arch Linux on is connected to your system. The lsblk command can be used for this.
Type in:
1
lsblk -o PTTYPE,NAME,SIZE,TYPE,MOUNTPOINT
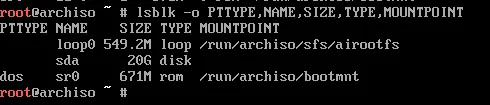
The drive where I want to install Arch Linux is located at sda, is 20 Gigabyte in size and has no partition table. This is fine because I want to do a clean install and will be formatting the whole drive.
But, if you are trying to install Arch Linux along existing Operating Systems, make sure that under PTTYPE, it shows your disk as gpt and you have free space or partitions that you can spare for your Arch Install.
Partitioning
Next, we will partition our drive. Here I will be creating three partitions, one for the Arch Linux install, another one to be used as an EFI partition, and a third, but optional one for swap.
There are many disk utilities that come with the Arch ISO, the one which we will use is cgdisk. It is easy to use and do work with when compared to other ones like fdisk.
In the terminal/console, type in:
1
cgdisk /dev/sda
Make sure to replace sda with whatever your disk is called.
Because I will be using my whole drive here, and it does not have any existing partitions, all of my drives capacity is showing up as empty space.
First, we will create an EFI partition. Select the empty space (if not already selected) and press New; You can use arrow keys to navigate.
For First Sector, press enter to use the default value.
Next, when it asks for Size in Sectors, type 500M there. 500 megabytes is more than enough for an EFI partition in my opinion.
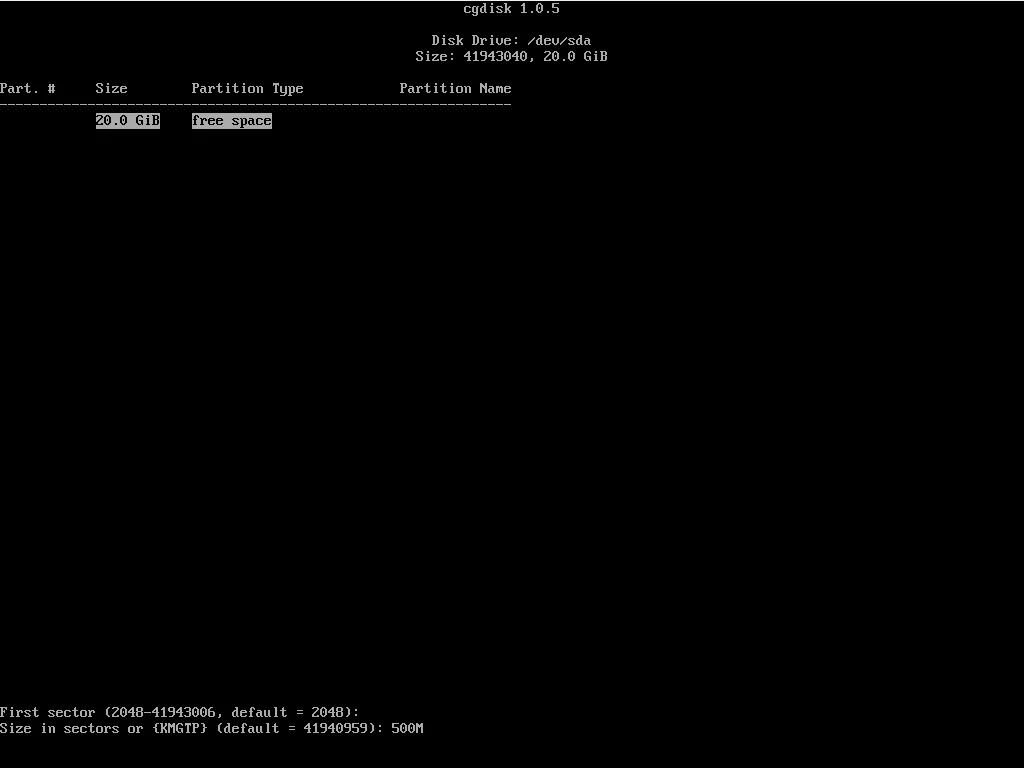 For the Partition Type, enter
 ef00 This is the partition code for an EFI file system.
With this, the creation of EFI partition is done and you should be back on the cgdisk main menu by now.
Now to create the main installation partition, select the free space again and hit New.
Skip the First Sector prompt by pressing enter.
In the Size in Sectors prompt, set the size for your main install. I will be using 18 Gigabyte, so I typed 18G and pressed enter.
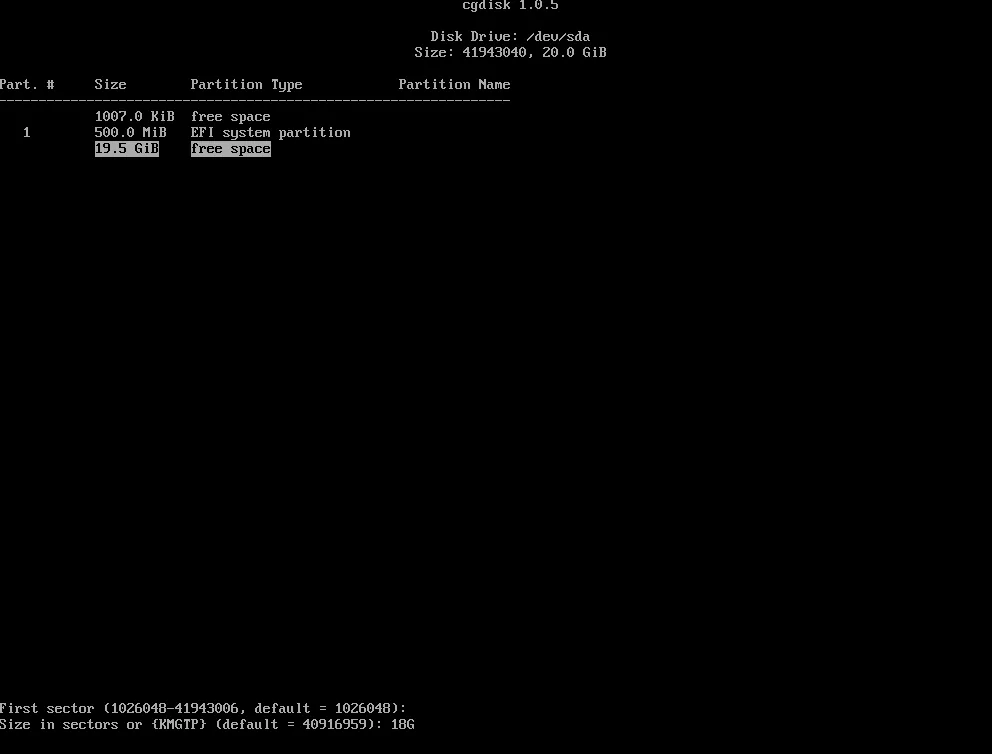 Partition type can be set to
 8300, the code for a Default Linux Filesystem.
Next we will be creating a swap partition. This is completely optional and can be skipped if you don’t want to use a swap.
Again select the free space, hit enter on New.
Press enter key to skip First Sector selection.
On the next screen set the size of the swap partition, I decided to use 1G. For partition code, type 8200 and press enter.
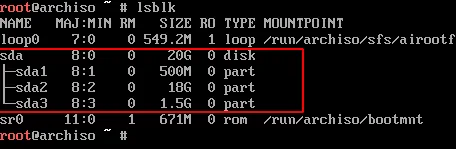
With this you should be done and ready to apply changes to your drive. Make sure to double-check the changes and when you verify everything, press w on your keyboard. cgdisk will now ask you to type yes to verify the changes that you have made. Do as directed and when it says “The Operation has Completed Successfully!”, you can go ahead and press q to quit from cgdisk.
Run the lsblk command to verify if your disk has been partitioned successfully.
Formatting
Now, when we are done with the partitioning of drives, we can not use them as it is. As they still don’t have any file systems, we will need to format them with appropriate file systems such as ext4 for the main partition and fat32 for the EFI partition.
To format the main root partition with ext4 file system, use command:
1
mkfs.ext4 /dev/sda2
To format the EFI partition, use command:
1
mkfs.fat -F32 /dev/sda1
(Note: Remember to replace sda1/sda2 with your own drive IDs.)
To verify, run this command:
1
lsblk -o NAME,FSTYPE
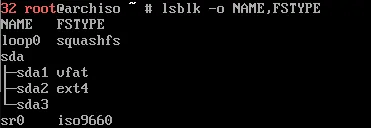
Once we are done with the formatting, we can move one to the next step, that is mounting the partitions.
We need to mount the partitions to a mount point. This will allow us to install Arch Linux onto the partitions and also deploy various packages and do configurations that we need from our current live installation environment.
To mount the root partition, type in:
1
mount /dev/sda2 /mnt
Create a new directory inside /mnt to mount the EFI partition:
1
mkdir /mnt/boot && mkdir /mnt/boot/efidir
Now to mount the EFI directory, type:
1
mount /dev/sda1 /mnt/boot/efidir
You can verify that the partitions have successfully mounted by running the lsblk command.
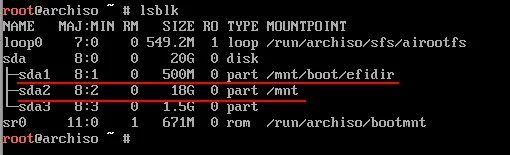
We are finally done with creation, partitioning, and formatting of our drives. Now we can move onto the next step that is installation of the system.
Installing the Arch System
Arch Linux Installation disk comes with a utility called pacstarp. Pacstrap can be used to installed base arch system, Linux kernel, and some packages that are required for a working system.
Type the command:
1
pacstrap /mnt base base-devel linux linux-firmware
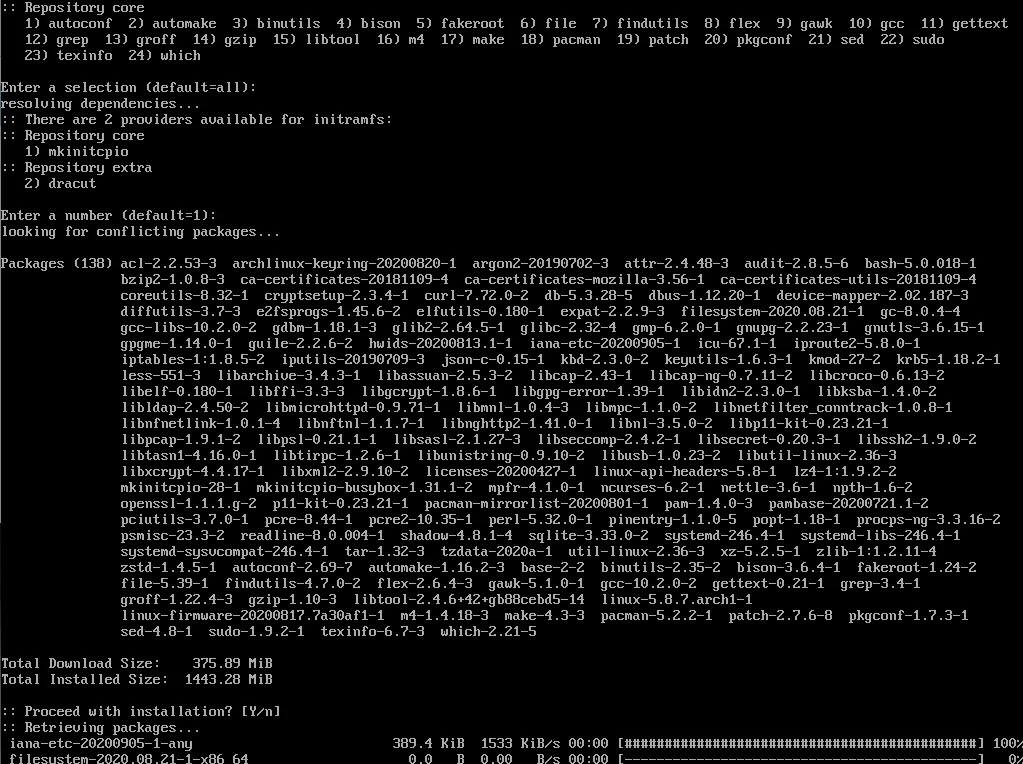
Let me break down this command for you. pacstrap is the name of the installation utility, /mnt is the location where our root partition is mounted, and base, base-devel, linux ,and linux-firmware are packages that we are installing.
base : This is for the base system.
base-devel : This package provides development tools & some utilities ( sudo, fakeroot, etc.).
linux : The Linux Kernel.
linux-firmware : Provides firmware (drivers) for some Propriety hardware such as trackpads, Wi-Fi cards, etc.
Once we are done with the installation of core components, we need to set up the fstab file.
The fstab, or /etc/fstab is responsible for mounting drives & partitions during boot in Linux. We need to add entries in fstab for our created partitions, so they can be properly mounted when our system boots.
We can use genfstab utility to do so. Type the command:
1
genfstab -U /mnt > /mnt/etc/fstab
Here is the explaining of what this command does.
/mnt : is the path where our main partition is mounted.
> : This will forward the output of the command to
/mnt/etc/fstab : the location of the fstab file for our new install.
Chrooting Into the New System
We can proceed to chroot into our new arch system to do some configuration. Chroot will allow us to log in into our new installation without actually booting into it.
Type in:
1
arch-chroot /mnt
We are now inside Arch Linux system that we just installed. The first thing that we will do is update the package database, to do so use command:
1
pacman -Su
After that is done we need to install a text editor, it will be used to edit some files as we progress with our install. For the sake of simplicity, we will be using nano, an easy-to-use command-line text editor.
To install nano, use command:
1
pacman -S nano
Once nano gets installed we can get started with setting the locales.
Setting Locales and Time
Type in:
1
nano /etc/locale.gen
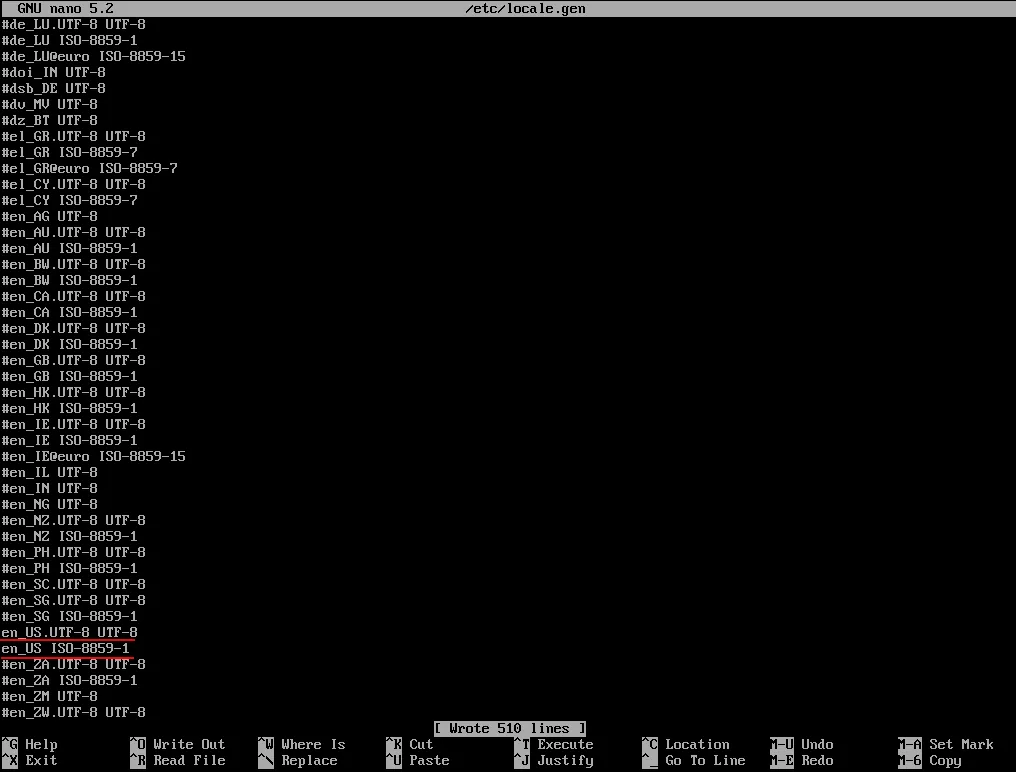
In this file, uncomment (remove #) the following lines:
1
2
en_US.UTF-8 UTF-8
en_US ISO-8859-1
These two lines were for setting locales (local currency, date formats, etc.) to American English.
Save the file by pressing Ctrl+s or Ctrl+o and exit nano (Ctrl+x).
Now use the command:
1
locale-gen
This will set the locales in accordance to the file that we just edited.
Now to set the default language, use command:
1
nano /etc/locale.conf
In there, paste:
1
LANG=en_US.UTF-8
Paste the above text there, save and exit.
Now, to make sure that time and date is displayed correctly on our new system, we will set the time zone.
To do this, type in the terminal (Replace America/Chicago with your own timezone):
1
ln -sf /usr/share/zoneinfo/America/Chicago /etc/localtime
For example the above command will set the timezone to America/Chcago.
You can find the list of all available continents using:
1
ls /usr/share/zoneinfo
and then the city by:
1
ls /usr/share/zoneinfo/America
Replace America with the continent you live in.
Now that we have set the timezone, we can sync the time with the hardware clock of our computer by using command:
1
hwclock --systohc
With this the locales, time, and language should be set on your new system.
Setting up hosts and hostname
Now we can move ahead and set the hosts file and hostname.
Open the hosts file using nano:
1
nano /etc/hosts
Now paste this and save the file:
1
2
127.0.0.1               localhost
::1                     localhost
To set the hostname, use:
nano /etc/hostname
In this file, type a name (singleword) for your new Arch Linux system and save the file.
Setting Users and Groups
Next, we will set the users and groups. First lets set a password for the root user.
type:
1
passwd root
Once done, we now need to create an new user for our system as using the root account is not advised.
In terminal, type:
1
useradd -m -U -G power,wheel,storage user
Note:replace user with your own username.
Hit enter and once done, you can verify the create of user and designated groups by:
1
groups user

ext, add a password for new user:
1
passwd user
As we will not be using the root account, we need to give our user sudo access in order to run elevated commands.
In terminal, type:
1
EDITOR=nano visudo
Find the line #%wheel ALL=(ALL) ALL and un-comment it. Now save the file and exit nano.
Setting up Network
To set up basic network access we will be using dhcpcd and netctl. Install the required packages using:
1
pacman -S netctl dhcpcd wpa_supplicant dialog
You can later remove the two packages, dhcpcd & netctl if you want to use other networking setup OR are planning to use a desktop environment that comes with its own networking management.
Installing the bootloader
The installation and configuration of your new arch system is now complete, but wait don’t restart yet. We need to install a bootloader for our system.
When it comes to bootloaders, there are a couple of options available for Linux. The one which we will be using is called grub.
To install grub, first fetch the grub & efibootmgr package from arch repositories:
1
pacman -S grub efibootmgr
When the package gets installed, type:
1
grub-install --target=x86_64-efi --efi-directory=/boot/efidir --bootloader-id=arch
If the installation is successful, you will see this message on your screen:
1
Installation finished. No error reported.
Now, generate the configuration file for grub, by using command:
1
grub-mkconfig -o /boot/grub/grub.cfg
Congratulation, you have now successfully installed Arch Linux on your system you are now ready to reboot into it.
First, exit the chroot environment by typing exit.
The unmount your disks:
1
umount /dev/sda1
&
1
umount /dev/sda2
Now type:
1
exit
Once you have exited from the chroot shell, you can go ahead and reboot your system:
1
reboot
After the reboot you should be in your newly installed Arch system. There you can log in using the user that you created earlier. If you have an Ethernet cable plugged into your system, internet should start working right away. You can also connect to the internet via wifi using:
1
sudo wifi-menu
Use the ping command to verify your connection.
From here on you can install any Desktop Environment, or a Windows manager, or just use the terminal interface for that matter. The beauty of Arch Linux is the freedom that it provides. After doing the base install, you can install any DE or WM of your choice, along with the ‘selected few’ apps & utilities that you need.
If you want to know how you can perform a minimal installation of KDE Plasma on a base Arch Linux, check out my post on that.
Thanks for reading and as always, comments, feedback, & suggestions, are welcome.