How to Install & Set up Minetest Server in Debian

Minetest is an opensource, free voxel game engine available for a variety of Operating Systems including Linux, Android, FreeBSD, iOS, Windows & macOS.
Minetest is not a game itself but an engine on which you can build your own game (Minetest Game is the default game that ships with minetest package),
The Minetest game does not offer any official servers but you can join other public servers or host your own server if you want to.
In this guide, I will show you how you can install & host your very own Minetest Server on Debian.
This guide can be applied to other Debian-based distributions, granted the required packages are available in that distribution’s reposotries.
If you are trying to Install Minetest Server in Linux Mint, check out this guide instead.
With this out of the way lets get started with the installation process.
First, check if any updates are available for your system using:
1
sudo apt update
and after that:
1
sudo apt upgrade
After updating the system, we can now proceed to installing the minetest-server package.
If you are installing on Linux Mint, you can go ahead and type this command to install the latest version of minetest-server onto your system.
But if you are using Debian, you might want to use backports. The default version of minetest-server on Debian repositories (at least in Debian 10) is not the latest one and you will encounter errors when connecting to it via a client running latest version of minetest game. This happens because of the version mismatch between server and client.
To fix this we can use Debian Backports. Backports allow you to fetch the latest version of packages in Debian.
In a console/terminal, type in:
1
sudo nano /etc/apt/sources.list
Now add these two lines to this file like shown in the screenshot below.
1
2
deb http://ftp.debian.org/debian buster-backports main
deb-src http://ftp.debian.org/debian buster-backports main
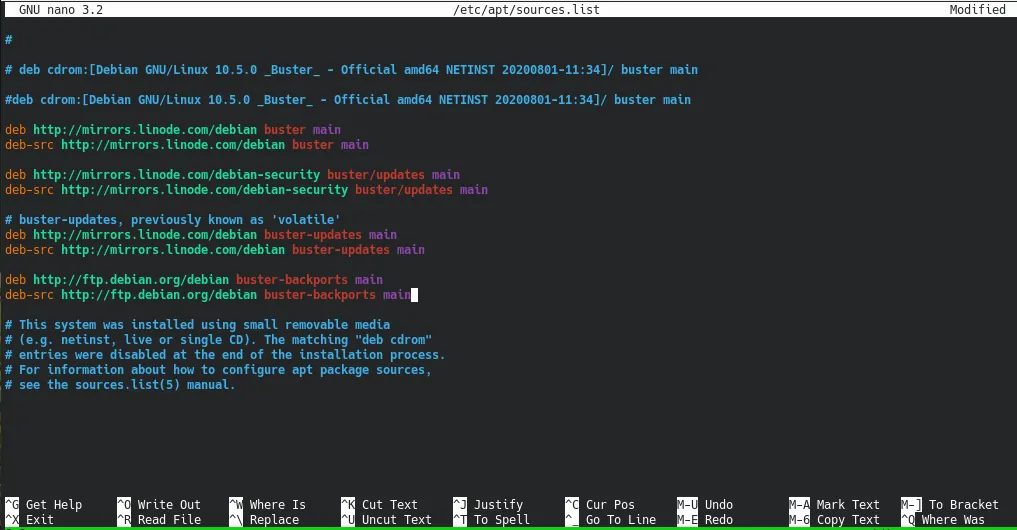
Here you can see that I have used buster-backports, that is because I have Debian 10 (Buster) installed on my system. If you have any other version of Debian running, you can replace the buster part with the name of that Debian release.
For example, in case of Debian 11 (bullseye), you can use bullseye-backports, and for Debian 12 (bookworm) use bookworm-backports.
Save it and close nano. (Ctrl+o to save and then Ctrl+x to exit)
Now that backports entry has been added to ‘sources.list’, you can go ahead and install minetest-server.
Type in:
1
sudo apt install -t buster-backports minetest-server
Once the installation is complete, open the configuration file for the minetest server to set things like server name, description, port etc. In a terminal, type:
1
sudo nano /etc/minetest/minetest.conf
This is the config file that gets read when minetest server starts up, you can edit it to configure your server to your liking.
Here are some basic ones that you can change.
You can now go ahead and start the minetest server, type: ``` sudo systemctl start minetest-server ``` And also type this command if you want to start the game’s server when your system/server boots. ``` sudo systemctl enable minetest-server ```
## Firewall Setup. If you have any firewall service enabled, you will need to whitelist the port that you have set, otherwise incoming or outgoing connections will cease to work on that port and you will not be able to join your server. Here is how to do that if you have ufw firewall installed. First verify that you are indeed using UFW. Type this command: ``` ufw status ``` If the output says `Status: inactive`, that means that the firewall is installed in your system but not active. If it says `ufw: command not found` that means that UFW is not installed. But If the command returns `Status: active`, that means that UFW is active on your system and will block all incoming traffic by default. To allow Minetest server’s port through the firewall, type: ``` sudo ufw allow 30000 ```
Change `30000` to the port that you have set in the config file. Type the command as it is if you have not changed the default port.
With all this done, the final thing that you need before you connect to your server is to find your IP address. On the device where you have installed minetest-server, type in a terminal: ``` ip a ``` If you are installing on a personal computer that not has a public IP address assigned, use any ip-checker website out there to get the IP address assigned to you by your ISP. Make sure that it is a static IP (i.e. it does not change after you disconnect from the internet) and not a dynamic one. Once you have your IP address, you can go ahead and open mientest client on your PC, click on **Join Game**, Type in your IP address port (default will be 30000 else type the one that you have set) and login with a username. You can use the password field to set a new password or just leave it empty. Make sure that you type in the value of `default_password` there if you have changed that in the config file. That’s it, you should be inside your new Minetest server.
This concludes my tutorial on how to install minetest-server in Debian. As always, if you have any questions or doubts, leave them in the comments below, I will try my best to help you.